Sloppy Stars
January 2008

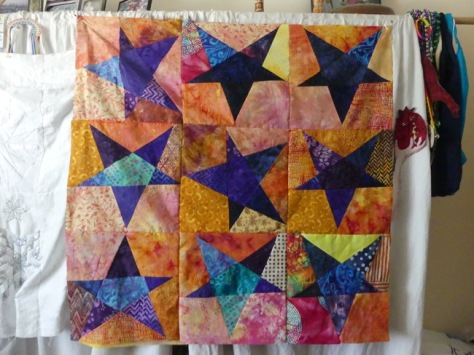
These stars ARE sloppy, and the original design, in which the star blocks were something like 9 x 14 were conceived by Evelyn Sloppy. I wanted a more square star, so I re-drafted it and . . . it worked!
Although your pattern will be cut 16.25 inches (DO NOT FORGET TO ADD .25 INCH TO THE OUTSIDE BORDER OR YOU WILL LOSE STAR TIPS!) your finished block will measure approximately 13”.

Make yourself a master copy, a copy you swear you will never cut. When you want to make this quilt, make copies on freezer paper from your master copy.
If you want alternating backgrounds (some stars light on dark, some stars dark on light) then you will need:
13 light fat quarters
12 dark fat quarters.
1. Starch, iron and stack all the lights together, and starch, iron and stack all the darks together.
2. Make two copies of the master chart on freezer paper. Iron one on to the top of the lights stack, and iron one onto the top fat quarter from the dark stack. Be sure to iron the freezer paper onto one side of the fat quarters so there will be plenty of leftover fabric for fixing up blocks, if you need it.
3. Put a fresh blade in your rotary cutter.
4. Holding your piles steady, make cuts in the order shown.
5. When both piles are cut, first on the light stack, we do the background pieces first:
start with A1 – take the top piece and put it on the bottom of the A1 pile.
Go to B1, take the top two pieces and put them at the bottom of the pile of B1’s.
B3, take the top three pieces.
D1, take the top four pieces.
A3 – do nothing! Now do the same process on the dark stack.
Now do the same with the star pieces in each pile:
C1 – take the top piece and put it on the bottom
B2- take the top 2 pieces
D2 – take the top 3 pieces
C3 – take the top 4 pieces
A2 – take the top five pieces
C2 – do nothing
Now take all the light background pieces and switch them to the dark star stack. Take the dark background pieces and switch them to the light star stack.
6. Piecing
Leave everything stacked.
Do not string piece; the stars get confused. I suggest you stitch all the pieces to each star at the same time. It takes a little longer, but it is worth it.
Stitch A3 to A2, and then stitch A1 to A2.
Stitch B2 to B3, then stitch B1 to B2.
Stitch C1 to C2, then stitch C3 to C2
Stitch D1 to D2.
Stitch the D Sections to the C section (trim the edges which will join so that they are even)
Your pieces will not have lined up exactly. With each star, trim the inner joining lines. Don’t worry about the outside, we will trim these blocks up when the blocks are finished.
As you stitch the sections together, the intersections will not be where they were on the pattern. Don’t worry. They don’t have to. Your stars will all work out. These are SLOPPY stars.
Stitch the A section to the CD section.
Stitch the ACD section to the B section.
I will tell you honestly at this point, my stars looked AWFUL – lots of wobbles because of the bias edges.
Press your stars, use a little starch, and then measure the smallest star. Trim your blocks to that size. Alternatively, if your smallest star is too small, you can use some of that leftover fabric to put a small border where you need it. Honestly, we do this all the time.
Arrange the blocks, 5 x 5, and sew them together. Put on a border, if you wish. The quilt, without a border, will be about 55 inches – but this is not a precise technique, and your results may be slightly different.
Quilting will take care of the wobbles.
ALTERNATE:
I did two quilts at the same time, because I wanted an all dark background and an all light background.
You need:
25 dark fat quarters
25 light fat quarters
When all your blocks are completed, use all the ones with dark background for one quilt and all the ones with light background for the second quilt. Keep one and give the other as a gift!
I did these in Christmas colors, but I have also seen them done in blues and whites, reds and whites, and once, fantastically, in rainbow colors.