Some Updated Thoughts on Sloppy Stars

I’ve done a lot of different kinds of quilts, but there are some quilt patterns I am drawn back to doing, maybe doing in new ways, maybe refining. I always love quilts with motion, like Kaleidoscope (click on Kaleidoscope in Categories to see instructions and variations) and another is Sloppy Stars.


It’s the hot, humid steamy season in Pensacola. It’s like winter in Alaska, it’s a good time to stay inside with your sewing machine and fabric except for when you need groceries, or to meet up with friends, or go to church, or even exercise – those are the exceptions. When it is steamy, it’s a great time to quilt.


One reason I love Sloppy Stars is that it makes such economical use of fabrics. You cut fat quarters – actually I cut mine to something like 18 inches square now – and slice, and then seam – no excess, except at the end when you trim as little as you have to on the outside, to make the blocks a uniform size. My goal is 15″ finished squares and now I am pretty good at getting them. My favorite part is picking out the fabrics. I don’t know exactly how they will look in the end, but that is part of the fun – getting fabrics that will jive and thrive, with a little bit of drama 🙂

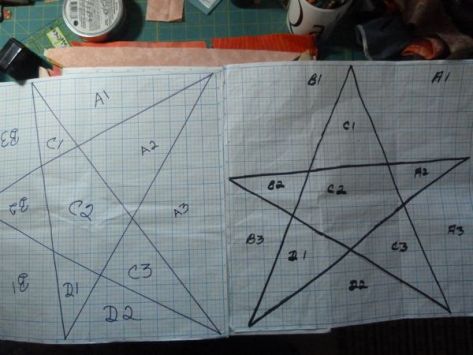
The original instructions for Sloppy Stars are here; these are just refinements I have come up with after doing so many of them. My stars have gotten bigger and bigger; it’s a dramatic cut and I like the efficiency of using a 15″ block. I have two different patterns I use, one is fairly straight, and one is very slanted and wonky. I find I am more drawn to the wonky one, guess I am a wonky one, too. These are drafted on 16″ graph paper I find in books at JoAnne Fabrics.


Because I ran short on freezer paper, I only had enough for two identical copies instead of four. I should’ve gone to the store for freezer paper – cutting 25 layers of fabric was more than my cutter could handle. I got some truly jaggy edges. If you are going for the 50 blocks (25 light 25 dark), do two cuts for each set; 12/13 is enough of a challenge for your rotary cutter. I will never try to cut 25 layers again. Never.

00StarsSameDifferent

I never string piece this block. I have learned from BAD experiences! I keep all the pieces flat; and the two sets (I do one with dark background light stars and one with light background dark stars) are kept separate. I always do one block at a time; each block takes about 12 minutes, I take it slow. It goes together fast, so it pays to go slow so you don’t mix up pieces. Keep away from cats! If a cat jumps up and upsets your pieces, you are out of luck! (Or maybe you will have a highly original quilt 🙂  )


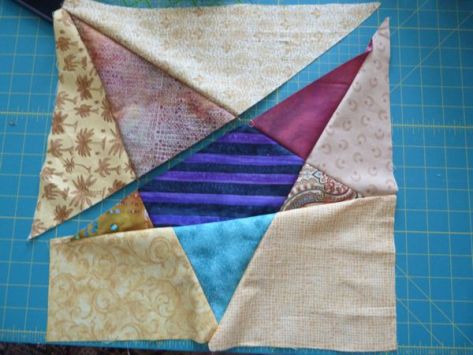
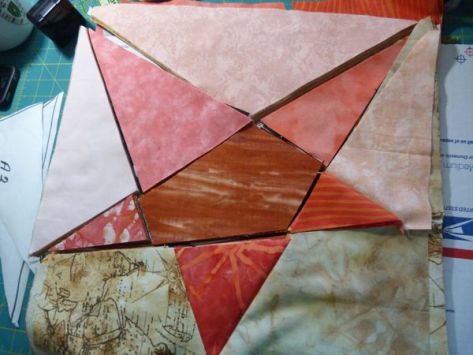
Although the instructions tell you which pieces to put together, I have my own way of doing it (LOL, I no longer follow my own instructions!) and I tend to start with the bottom three pieces in the photo below – star point to the left piece, and then to the right. I then go to the two pieces in the upper right sector, sewing from the straight line to the outer edge.

00StarsAssembly


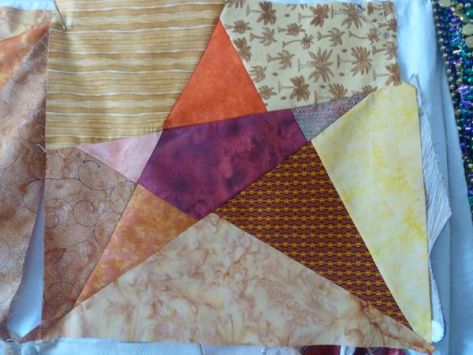
By taking your time and lining things up (it comes easier with practice) you get the interior lines to match up and end up with a fairly straight line. The fairly straight line makes joining the components easier when you sew the major three blocks together.00StarsFirstSection
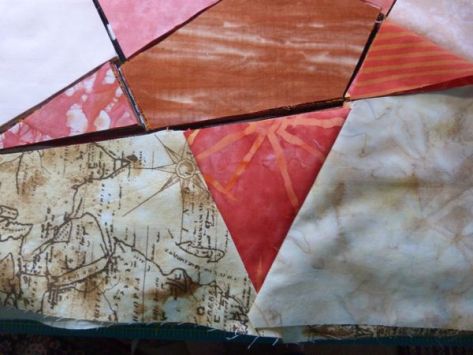
 

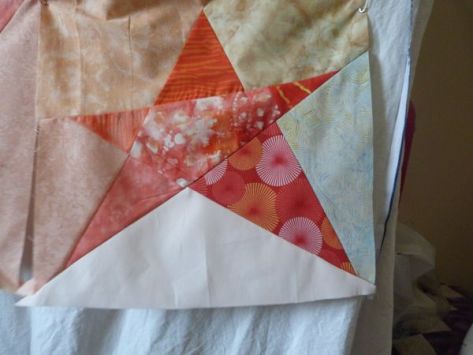
Next, I do the central three blocks, and when I finish them, I line up the star point seams and sew the small sector to the larger central sector. With any luck at all, you’ll have a nice join and the appearance of a straight line. Then you sew the last three pieces (upper left sector) together, focusing on making the interior seam the straight seam.


Because of the way these stars are cut, you are only very rarely ever going to get the last piece to line up at both parts of the center star, so focus on lining up the seam so that you get one straight seam with the join giving you a straight line at the upper right.

00StarsAddLastSection


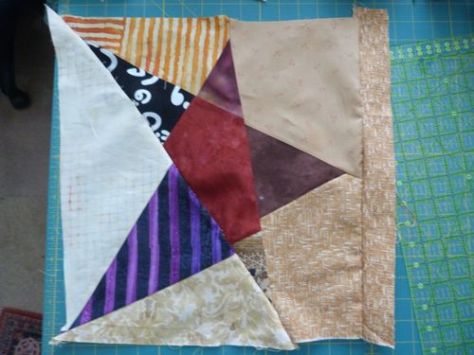
Things don’t always work out. Don’t worry. Wonky blocks are part of the charm of this technique. Two straight lines is great; three straight lines are awesome but all in all – are you having fun? No one is going to nit-pick this quilt, there are too many distractions! (Below is a wonky block I will truly use, but I wanted to show you that no matter how hard I try to be perfect, I am a miserable failure who sometimes doesn’t even manage two straight lines. I am a miserable failure who is having a lot of fun putting these stars together, though 🙂

00Stars2Straight2WonkyLines


This star comes pretty close to the goal – Four pretty good straight lines, almost five. That fifth just isn’t ever going to happen.

00Star3StraightLines


But, even though they are all cut the same way, and I do my best to stitch them the same way, for no apparent reason, now and then one star goes wild. The truth is, no one but you will ever know, but this is why I save my leftover strips after I have trimmed the stars down before slicing.

00WonkyStarRepair


I even took this one apart and restitched it, but no matter what I did, it was dangerously out of whack. I added a one inch strip to the wackiest side, and was able to even everything up within reason, but this will never be a star that gives me satisfaction. It may, however, be one of those blocks that gives a quilt “character.” (When the blocks are sewn together, that addition will disappear . . . you just don’t see it in the wildness of all the diferent patterns and shapes.)


There are a lot of different ways to quilt these stars. In the African series, I used more angular quilting, and I liked it, it looked good with the African fabrics. In some of these quilts, I use a spiral out of the center block, and then elongated squiggles from the central star piece radiating out to the star tips. The background I stipple.
Fabric To Make My Heart Sing

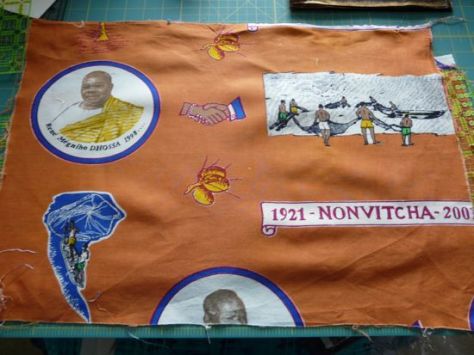
Today I am cutting for a new quilt, another scrap quilt, another Africa quilt. I came across this wonderful piece of fabric. I believe I got it from my French quilting friend who lived in Ghana, but it also may have come from the international trade fairs in Qatar, where Africans would come and sell their fabric.

Did you know that fabric manufacturing in Africa has been hit hard? The problem is what they call “Dead White Peoples’ Clothes.” Bales and bales of used American clothing land in African countries, and no one believes that living people would part with clothing in such good condition, therefore, dead peoples’ clothes. Bales and bales and bales, literally TONS of clothing dumped in Africa, and it has nearly killed the need for locally produced fabrics and clothing.

This fabric celebrates the Nonvitcha à Grand Popo, which I can only guess is a celebration either of the birthday of or the reign of “The Grand Popo” of Benin. That guess would be wrong. Wikipedia says the Grand Popo is “a town, arrondissement, and commune in the Mono Department of south-western Benin.”

Don’t you love this fabric?

Chained Islamic Stars

I actually started this quilt many many years ago, I believe while we still lived in Germany, and I got 37 squares finished and ran out of steam. It is a very fiddly design. I designed it myself. The finished square was 9 inches and the post and sashing was one inch, but it was all one inch, (cut 1.5″) and man, it was tiresome.

I also didn’t quite know how to make the chain work, but last week as I sorted in preparation for packing up the quilt room, I knew what to do. When I had a surprise and one morning of my week fell open, I was able to stitch 36 into a nice quilt top that I can use as a table cover – or something. I got to show it at the Qater Quilt Guild meeting yesterday, before it gets packed up. It will be months before I can get to it once more.

The truth is, even after 10 years, I love the intricately patterned fabrics I found for the stars. Ten years later, I rarely use white as a background – now, I am itching to try this same pattern (I can figure out now how to do it with less fuss) with a dark background. I love the way it has all gone together.

For my Kuwait friend – I don’t think you ever even saw this unfinished one, but slowly slowly I AM working on that pile of UFO’s you assigned me!

New Page

In support of the Q8Quilters goal of sending 20 quilts to  Alanna’s Orphans project to provide quilts for an orphanage in Kurdistan, I have posted a new page with simple quilts that can be made quickly for charitable projects.

The quilts for Alanna’s project are supposed to be 55″ x 77″ (more or less). Alanna has said AROUND 55″ x 77″ as the kids range in age from 5 – 15, and the quilts will be used as bedding.

Any of the quilts can also be made smaller. They are all good for using up perfectly good fabrics left over from earlier quilting projects.

Over on the right, under “Pages” you will see a page called Quick Quilts for Charity. They are very basic quilts, and you are free to use them and modify them any way you wish.

Sloppy Stars

These are the quilts demo’d at the Q8Quilters Hands-On meeting today:

Sloppy Stars

January 2008

00dancing-stars.jpg

These stars ARE sloppy, and the original design, in which the star blocks were something like 9 x 14 were conceived by Evelyn Sloppy. I wanted a more square star, so I re-drafted it  and . . . it worked!

Although your pattern will be cut 16.25 inches (DO NOT FORGET TO ADD .25 INCH TO THE OUTSIDE BORDER OR YOU WILL LOSE STAR TIPS!) your finished block will measure approximately 13”.

sloppystardiagram.jpg

Make yourself a master copy, a copy you swear you will never cut. When you want to make this quilt, make copies on freezer paper from your master copy.

If you want alternating backgrounds (some stars light on dark, some stars dark on light) then you will need:

13 light fat quarters

12 dark fat quarters.

1.  Starch, iron and stack all the lights together, and starch, iron and stack all the darks together.

2.  Make two copies of the master chart on freezer paper. Iron one on to the top of the lights stack, and iron one onto the top fat quarter from the dark stack. Be sure to iron the freezer paper onto one side of the fat quarters so there will be plenty of leftover fabric for fixing up blocks, if you need it.

3. Put a fresh blade in your rotary cutter.

4.  Holding your piles steady, make cuts in the order shown.

5.  When both piles are cut, first on the light stack, we do the background pieces first:

start with A1 – take the top piece and put it on the bottom of the A1 pile.

Go to B1, take the top two pieces and put them at the bottom of the pile of B1’s.

B3, take the top three pieces.

D1, take the top four pieces.

A3 – do nothing! Now do the same process on the dark stack.

Now do the same with the star pieces in each pile:

C1 – take the top piece and put it on the bottom

B2- take the top 2 pieces

D2 – take the top 3 pieces

C3 – take the top 4 pieces

A2 – take the top five pieces

C2 – do nothing

Now take all the light background pieces and switch them to the dark star stack. Take the dark background pieces and switch them to the light star stack.

6.  Piecing

Leave everything stacked.

Do not string piece;  the stars get confused. I suggest you stitch all the pieces to each star at the same time. It takes a little longer, but it is worth it.

Stitch A3 to A2, and then stitch A1 to A2.

Stitch B2 to B3, then stitch B1 to B2.

Stitch C1 to C2, then stitch C3 to C2

Stitch D1 to D2.

Stitch the D Sections to the C section (trim the edges which will join so that they are even)

Your pieces will not have lined up exactly. With each star, trim the inner joining lines. Don’t worry about the outside, we will trim these blocks up when the blocks are finished.

As you stitch the sections together, the intersections will not be where they were on the pattern. Don’t worry. They don’t have to. Your stars will all work out. These are SLOPPY stars.

Stitch the A section to the CD section.

Stitch the ACD section to the B section.

I will tell you honestly at this point, my stars looked AWFUL – lots of wobbles because of the bias edges.

Press your stars, use a little starch, and then measure the smallest star. Trim your blocks to that size. Alternatively, if your smallest star is too small, you can use some of that leftover fabric to put a small border where you need it. Honestly, we do this all the time.

Arrange the blocks, 5 x 5, and sew them together. Put on a border, if you wish. The quilt, without a border, will be about 55 inches  – but this is not a precise technique, and your results may be slightly different.

Quilting will take care of the wobbles.

ALTERNATE:

I did two quilts at the same time, because I wanted an all dark background and an all light background.

You need:

25 dark fat quarters

25 light fat quarters

When all your blocks are completed, use all the ones with dark background for one quilt and all the ones with light background for the second quilt. Keep one and give the other as a gift!

I did these in Christmas colors, but I have also seen them done in blues and whites, reds and whites, and once, fantastically, in rainbow colors.

Cutting Up In January

One of the keys to quilt production is organization. Once you’ve got Christmas all put away, it’s time to look at the quilting room.   
I have a secret vice. I LOVE rotary cutting. I love it so much that sometimes my quilting friends will ask me to cut things out for them and they will stitch things up for me, or do some other craft related favor. It all works out in the long run ;-).   
So you can imagine – I love January. January is when I grab those boxes and baskets of scraps I have tossed. I put an iron and ironing board in my sewing room and starch (good old Sta-Flo) up all those scraps and iron them, then cut them up. I cut 2 1/2 inch strips first. I cut blocks in 7″, 6.5″, 6″, 5.5″ (etc) . . . . and store them in piles with a lable on top. Just as I love those 2.5″ strips, I love the 2.5″ squares, and have shoeboxes of them, all sorted by color.     
(Remember those map quilts we looked at earlier? When you need a zillion different desert colors, or greens, or blues for the sea, you already have a goodly stash cut up if you do your January homework.)    
You can also do that   Sweetheart Quilt, either in reds or in a variety of scrappy colors. I think I remember that it takes about 49 squares per block – that uses up a LOT of scraps, and it is a fun quilt and a quick quilt to make, again, a great group activity.  
It also makes sense to cut up all those squares with a bunch of friends because you can exchange and have lots and lots of different scrap colors in your quilt. Some years, I have gotten together with friends and we’ve all cut-up together, and that is really a lot of fun. It has to be the right friends, though, who can balance FUN with a sense of mission – I am a little obsessive (a LITTLE???) about getting my January cutting done. The best year was when we brought food, and just kept cutting and cutting until we were all ready to drop.    
And here is the really cool thing. As you cut, you come across fabrics you had totally forgotten, and those old creative juices start flowing. As you cut, two or three or four quilts will start forming in your mind, so keep you little gridded notebook handy, and write down those ideas before they slip away!   
Once you have all those scraps cut, labeled, sorted and put away, take a couple hours to get your workroom back in order. If you are anything like me, the creation process is messy. I pull out all kinds of fabrics, looking for just the right combination, and you know, while you are on a roll is NOT the time to be obsessive about putting things away. . . you just cut and sew and audition and back to the drawing board – it’s a burning-the-midnight-oil kind of energy, and you don’t want to dilute it with dutiful energy, just go go GO!   
So from time to time, you have to pay the piper. This is a good time – now that you’ve so virtuously cut up all your scraps – a great time to sort all those fabrics and put them back neatly on the shelves. Again – you will see old friends you have totally forgotten, and they will call out to you, and new ideas will pop into your head. But this isn’t the time to dilute that virtuous, dutiful energy with creative energy; quickly jot down the ideas but KEEP GOING, straighten, organize, file by color and pattern, get it all put away.   
Once you have your work room all neat again you don’t need me to tell you what to do next. You will be on fire to get started. Don’t ya just love that January energy? New year, new quilts?