Sloppy Stars

These are the quilts demo’d at the Q8Quilters Hands-On meeting today:

Sloppy Stars

January 2008

00dancing-stars.jpg

These stars ARE sloppy, and the original design, in which the star blocks were something like 9 x 14 were conceived by Evelyn Sloppy. I wanted a more square star, so I re-drafted it  and . . . it worked!

Although your pattern will be cut 16.25 inches (DO NOT FORGET TO ADD .25 INCH TO THE OUTSIDE BORDER OR YOU WILL LOSE STAR TIPS!) your finished block will measure approximately 13”.

sloppystardiagram.jpg

Make yourself a master copy, a copy you swear you will never cut. When you want to make this quilt, make copies on freezer paper from your master copy.

If you want alternating backgrounds (some stars light on dark, some stars dark on light) then you will need:

13 light fat quarters

12 dark fat quarters.

1.  Starch, iron and stack all the lights together, and starch, iron and stack all the darks together.

2.  Make two copies of the master chart on freezer paper. Iron one on to the top of the lights stack, and iron one onto the top fat quarter from the dark stack. Be sure to iron the freezer paper onto one side of the fat quarters so there will be plenty of leftover fabric for fixing up blocks, if you need it.

3. Put a fresh blade in your rotary cutter.

4.  Holding your piles steady, make cuts in the order shown.

5.  When both piles are cut, first on the light stack, we do the background pieces first:

start with A1 – take the top piece and put it on the bottom of the A1 pile.

Go to B1, take the top two pieces and put them at the bottom of the pile of B1’s.

B3, take the top three pieces.

D1, take the top four pieces.

A3 – do nothing! Now do the same process on the dark stack.

Now do the same with the star pieces in each pile:

C1 – take the top piece and put it on the bottom

B2- take the top 2 pieces

D2 – take the top 3 pieces

C3 – take the top 4 pieces

A2 – take the top five pieces

C2 – do nothing

Now take all the light background pieces and switch them to the dark star stack. Take the dark background pieces and switch them to the light star stack.

6.  Piecing

Leave everything stacked.

Do not string piece;  the stars get confused. I suggest you stitch all the pieces to each star at the same time. It takes a little longer, but it is worth it.

Stitch A3 to A2, and then stitch A1 to A2.

Stitch B2 to B3, then stitch B1 to B2.

Stitch C1 to C2, then stitch C3 to C2

Stitch D1 to D2.

Stitch the D Sections to the C section (trim the edges which will join so that they are even)

Your pieces will not have lined up exactly. With each star, trim the inner joining lines. Don’t worry about the outside, we will trim these blocks up when the blocks are finished.

As you stitch the sections together, the intersections will not be where they were on the pattern. Don’t worry. They don’t have to. Your stars will all work out. These are SLOPPY stars.

Stitch the A section to the CD section.

Stitch the ACD section to the B section.

I will tell you honestly at this point, my stars looked AWFUL – lots of wobbles because of the bias edges.

Press your stars, use a little starch, and then measure the smallest star. Trim your blocks to that size. Alternatively, if your smallest star is too small, you can use some of that leftover fabric to put a small border where you need it. Honestly, we do this all the time.

Arrange the blocks, 5 x 5, and sew them together. Put on a border, if you wish. The quilt, without a border, will be about 55 inches  – but this is not a precise technique, and your results may be slightly different.

Quilting will take care of the wobbles.

ALTERNATE:

I did two quilts at the same time, because I wanted an all dark background and an all light background.

You need:

25 dark fat quarters

25 light fat quarters

When all your blocks are completed, use all the ones with dark background for one quilt and all the ones with light background for the second quilt. Keep one and give the other as a gift!

I did these in Christmas colors, but I have also seen them done in blues and whites, reds and whites, and once, fantastically, in rainbow colors.
Map Quilt Class

Map Quilts

28 January 2008


These are all the map quilts in one place, with class instructions on how to make them: 


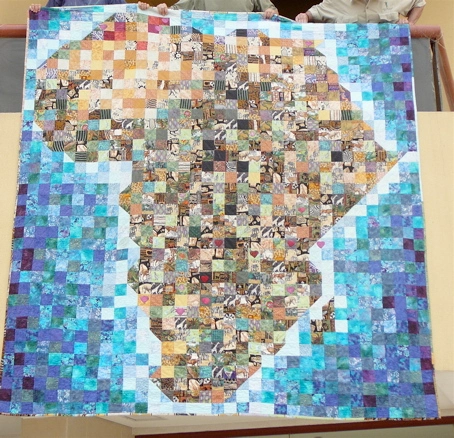
00africaquilt.jpg 

I left my Heart in Africa 

 00md.jpg

 Moroccan Dreams


00turkishdelight.jpg 

Turkish Delight 


00kafricatop.jpg 

African Kaleidescops 


Lawrence of Kuwait

Lawrence of Kuwait

1.  Start with a graph

Find the country you want to map, or state, or entire continent, and draw it onto your graph paper. It may change several times – that’s OK. You have time. Figure out what colors you want to use, and why. Identify any motifs you may want to use, appliqué, pieced or quilted.  Figure out what you are going to do with the area that is NOT part of your focus country!


2.  Gathering the Fabric

This actually takes the most time. You need many many different blues, for example, if you will have sea, shading from the very lightest to deeper purple, if it goes deep. You may want desert tones, or greens. You may want fabric from the country you are making, or you may want to appliqué something onto a square, and to identify where you will want it to go.


One really fun part is to ask your friends. You don’t need even a fat quarter, just scraps big enough for a couple squares. The greater the variety you acquire, the greater your flexibility in placement. As an example, I probably use 50 different “sea colors” ranging from the lightest blues to the deepest purples. My friends gave me Egypt fabrics, and Sudanese fabrics. 


These first two steps can take months, or even years. You will come up with all kinds of amazing ideas. Keep your plans for your map quilt in one place, and write down your ideas when you think of them, so you don’t forget them.


3.  Distributing the colors

I usually figure out where I want different colors – all the golds to almost white in the desert, for example, maybe this quadrant will be red. In the Africa quilt, I used pure black for some places where terrible things were happening. It helps the balance of the quilt to have colors grouped together, and that takes some planning. Also, now is the time to make any specialty blocks you may want to include.


Take a look at your fabrics, and at your graph. Figure out how big you want the quilt to be. In the first Africa quilt, for example, the smallest I could cut the giraffe fabric and still have it be effective was 3.5”. That one fabric, and my desire to use it, drove the entire quilt to its current huge size.


Even if you have been cutting fabrics all along, when you finally get to the point where you are ready to start – you will have to start with cutting. To have enough of every color, you just cut a lot. Even so, there are times when you will have to get up from sewing to cut some more.


I don’t go to a lot of effort to be accurate about terrain, but if you want to include a lake, or mountains, or something particular to that region, you can either use fabrics which show what you wish to emphasize, or you can create your own lake, or desert, or fields of flowers – it’s your quilt, you get to be the boss! 


Mountains: You can make a large mountain by making it four squares big, white mountain with blue sky , for example, or black mountain with blue or white sky. As long as you have planned ahead, anything is doable. Smaller mountains can be exactly the same size as the other blocks. It’s just nice to have a little variety. 


4.  Execution:

Break your quilt into doable sections. You might use quadrants, and each quadrant usually has a dominant color. Cookie trays can keep the squares in some kind of graduated order. Always have the graph on the wall, so you can check it frequently, and use a project wall, where you can hang the completed sections and check them as you go along. 


You might do two rows, sew them together, and then sew them directly to the section where they belong. It might seem fiddly, but it helps you keep track of where you are on the graph, and it helps you see where you might want to add more deep / light colors, etc. It is also just a lot of fun to watch it grow.


As you go along, check off each row as you complete it. Again, it may seem fiddly, but it is easy to get lost and confused, especially when you are working on a section of coastline, and you need to get the half-square triangles going the right ways! 


5.  Quilting and Embellishing

It has been so much fun, just watching all those colors come together and blend into a fabric collage of a country. Now is time when you can make it even more special.


Make the sandwich. 


Do a quarter inch outline of the continent/country you are working on, very first thing. It helps keep everything stable, and it gives your focus some definition.


If there are particular quilting motifs you want to use – a mariner’s compass in the sea, for example, or camels crossing the desert, or a hand of Fatima, or a teapot – you’ve been gathering them all together, and now you get to have the fun of putting them in.


You might want to do waves, and spirals, and fish in the sea. You might have your own ideas to make this quilt uniquely your own creation, and now is the time to explore them. These map quilts are not serious quilts, they are supposed to be fun. 🙂


6.  Surprise.

In every map quilt I do (and in many of the others) I put a surprise. In the Morocco Dreams quilt, I put a camel in the desert, so big you couldn’t see him unless you stood about ten feet away. He was in slightly lighter colors than the rest of the desert. I also outlined him in hand quilting. 


You might want to machine quilt in the name of the person for whom you are making the quilt, the date and the place. You  might want to machine embroider your own name in the quilt, in an inconspicuous spot, where some quilt-heritage researcher may someday find it and rejoice! Most of all, this is where you can have fun with embellishing the map so that it tells something about why you chose this country, something about how you feel about this subject. Here is where you can use charms and beads and crystals to highlight special and unique qualities.


Photos and more instructions at :  worldquilter.wordpress.com.  Click on map quilts under categories, over on the right hand side.

Brianna’s Wave Border

On the historical record page are several quilts which I have recently been able to rephotograph, or photographed photographs (lousy quality) just so I would have SOME record of these quilts. Brianna’s Wave was made after I made Mom’s Seaside Quilt, and as I was cleaning and straightening and cutting up in January, I found the original Wave pattern – I had to figure out an exact size so the border would fit.

I still have some left, and I am glad because I really loved the Greek-key kind of impressionism of the wave border.  This was paper-pieced: 

00briannas-wave.jpg 

True Vine

Wooo Hoooo! Found two more! I liked this project so much I did it again for a gal who was leaving. I might have to do one for myself one day. This one I challenged myself to use one piece of fabric, one very small piece (the grapes) as fully as possible. In the border is a quote from the gospel of John about the True Vine:

00truevine1.jpg  

This one was a farewell quilt/hanging: 
00truevine2.jpg 

My Bad ;-)

Like many quilters, I specialize in rationalization. As the last days of the year 2007 slipped away, I prepared for my January cutting and cleaning and organizing.  

As I was putting some fabric away, I came across an old friend I had forgotten. Hmmm. . . . . 6 repeats . . . . just enough to try that hexagon quilt technique again and see if I like the results any better . . . 

I had complained to my guild about the annoyance of working with one grain line and two bias lines when sewing these triangles together to form the hexagons and they said “Starch! starch! starch!” so I had a dilemma . . . here, in my hand is the perfect piece of material to try cutting out another hexagonal quilt.On the other hand, I could get a head start on the January cutting-up and organized. . .

I did what ANY hot blooded quilter would do – I got right to work on a new quilt top!

00mybad.jpg  

Bottom line – This technique is fun, the starch helped, but two quilts later, I don’t like it any better than I did before in terms of results. This is just Stack n’ Whack with a twist, and that twist is the putting together the hexagons in rows, arranging the colors, etc.

I am never quite satisfied that my efforts in this technique are particularly artistic, and I am not particularly delighted with the quilt top, although there are times it takes me a while and then one day I realize I love the quilt. Sigh – now either I have to sandwich or cut. It’s January. It’s 2008. One drudgery or another (although once I get started I actually enjoy it.)