Maze or InterConnected Circles

00InterlockingCircles

I made this quilt months ago. It looked complex, and I wanted a challenge. Once I saw how to do it, I went ahead, but this is one of the most tedious quilts I have ever made.

Mostly, it is tedious because it is repetitious. Half the squares are snowballs, half with one color, half with the other.

All the alternating blocks are exactly alike, just given a quarter turn so that on alternate rows all one color is on top and on the others, the other color.

Once you get through the endless putting together of the same squares, assembly goes quickly.

I used this quilt to practice feathers 🙂

Big yawn. I thought I would do it in a garden print with garden-y white and green circles, sort of like a lattice work. If I were to do it again – which I won’t, because it bored me to tears – I would do it with a stronger background print.

Note: A lot of people love this quilt. That’s fine with me; my objection is only that once you know the trick (it’s all an optical illusion) it just isn’t that interesting to make, for me.

The Generous Heart

“A friend is going to Pensacola!” my Kuwaiti friend wrote to me, “What can I send you?”

My heart immediately went to my two favorite places, the supermarket and the fabric souks. Did you know it is illegal to bring in fresh green vegetables into the United States, or meat? (I brought some jerky once from South Africa and ended up with all the people who were bringing monkey brains and special Namibian melons to all their family members. Fortunately, I got a lecture, not a fine.)

So – just a little fabric, I asked. Something Kuwaiti looking, or African, colors in combinations you can’t get here in Pensacola.

“Doh!” as Homer Simpson says. I should have remembered how generous my friend is. It’s something she isn’t even aware of, she just gives, freely gives, like she thinks everyone is as generous as she is.

Her friends delivered the packet to my door. In it are yards and yards of fabrics, and as I lift them to my nose, I can smell the souks. . . I miss the souks 🙂

So much fabric, such a wealth of fabric!

00FabricKuwaitSouks

But even better – look at the bag she packed it in!

00EgyptForEgyptians

I asked her about it and it is a good thing I did. I had immediate thoughts of using it as a center medallion in a quilt, but she said it was designed by a famous Egyptian artist, Helmi El Touni, to raise funds for medical treatment for students and protestors injured during the Arab Spring. She also said she did not think the ink was water proof. Oooch! I needed to hear that! Now, it will not go into a quilt but maybe some kind of frame . . . I love those braids 🙂

I smile every time I see these fabrics.

The Road To Damascus

This is another of my playing around quilts. In order to do Annie’s quilt, I had to do a lot of squares. You really have be careful about gradations to make these quilts work, or at least work for me. I like things to shade from dark to light and from the purple reds to the lightest ash for desert quilts. As a result, I had a quilt’s worth of four patches left over, and a great idea for a Road to Damascus 🙂


As I worked on this quilt, I was listening to National Public Radio coverage of Syria, a place we have been blessed to visit often and thoroughly. While I cannot help but love Damascus the best, and visited it last in 2008, I have travelled Syria from the coastal city of Tartush to Palmyra and Tell Mari in the east, and all kinds of places in between with a Friends of Archaeology group I used to belong to out of Amman, Jordan. Syria was as close to biblical country as I have ever experienced. I learned so much. I met the nicest Syrians in the world.
 

So I finished the main part, and then as I showed it in my small group, the demo for the day was on curved piecing. I had seen demos on it before and it hadn’t interested me, but all of a sudden, Leni was demo’ing with two desert-y colors and the light went on – I could do a great curved border.

00RoadToDamascus
 

Once I got started, the curved part was easy, like it took one half day. I had not accounted for how much more curves take out of the finished border, and I wanted more, like a purple dusk sky .  . . So I added that, too. Then I got bit by the nostalgia bug and I thought it would be fun to add some little villages, like we would pass along the roads. Well, impressions of those little villages; I am not a good person for portraying realism, but I like the charm of my little villages.

Note to self: curved borders are not such a good place to learn about curved piecing. Start with curved blocks, and give yourself extra fabric if you already have a set block size in mind. Because of the nature of curves, piecing curves results – at least for me – in sections that are off square. I love the piece of fabric I used as a final border, but it was driven less by art than by necessity – I had to have enough border and I needed to be able to trim so that the borders would be true. Curved pieces worked here, but I wouldn’t use them as a border again.

00CurvedBorder

00VillageScene

MosqueBorder

This little piece is not from Damascus, or Syria, but is a quirky tower erected by the Qatar Center for the Presentation of Islam, in Doha. I never studied in this tower, but what Arabic I speak, I owe primarily to them and their patience with me as I struggled to speak, read and write in their language. As they taught me more about the Quran, and Islam, it illuminated our own Christian teachings. This was a never-ending wonder to me. These kind women did not proselytize, but they shared their lives with me, and through their eyes, I came to understand so much. This little tower is just a small homage to their patient teaching.

00QCPITower

Some Updated Thoughts on Sloppy Stars

I’ve done a lot of different kinds of quilts, but there are some quilt patterns I am drawn back to doing, maybe doing in new ways, maybe refining. I always love quilts with motion, like Kaleidoscope (click on Kaleidoscope in Categories to see instructions and variations) and another is Sloppy Stars.


It’s the hot, humid steamy season in Pensacola. It’s like winter in Alaska, it’s a good time to stay inside with your sewing machine and fabric except for when you need groceries, or to meet up with friends, or go to church, or even exercise – those are the exceptions. When it is steamy, it’s a great time to quilt.


One reason I love Sloppy Stars is that it makes such economical use of fabrics. You cut fat quarters – actually I cut mine to something like 18 inches square now – and slice, and then seam – no excess, except at the end when you trim as little as you have to on the outside, to make the blocks a uniform size. My goal is 15″ finished squares and now I am pretty good at getting them. My favorite part is picking out the fabrics. I don’t know exactly how they will look in the end, but that is part of the fun – getting fabrics that will jive and thrive, with a little bit of drama 🙂

The original instructions for Sloppy Stars are here; these are just refinements I have come up with after doing so many of them. My stars have gotten bigger and bigger; it’s a dramatic cut and I like the efficiency of using a 15″ block. I have two different patterns I use, one is fairly straight, and one is very slanted and wonky. I find I am more drawn to the wonky one, guess I am a wonky one, too. These are drafted on 16″ graph paper I find in books at JoAnne Fabrics.


Because I ran short on freezer paper, I only had enough for two identical copies instead of four. I should’ve gone to the store for freezer paper – cutting 25 layers of fabric was more than my cutter could handle. I got some truly jaggy edges. If you are going for the 50 blocks (25 light 25 dark), do two cuts for each set; 12/13 is enough of a challenge for your rotary cutter. I will never try to cut 25 layers again. Never.

00StarsSameDifferent

I never string piece this block. I have learned from BAD experiences! I keep all the pieces flat; and the two sets (I do one with dark background light stars and one with light background dark stars) are kept separate. I always do one block at a time; each block takes about 12 minutes, I take it slow. It goes together fast, so it pays to go slow so you don’t mix up pieces. Keep away from cats! If a cat jumps up and upsets your pieces, you are out of luck! (Or maybe you will have a highly original quilt 🙂  )


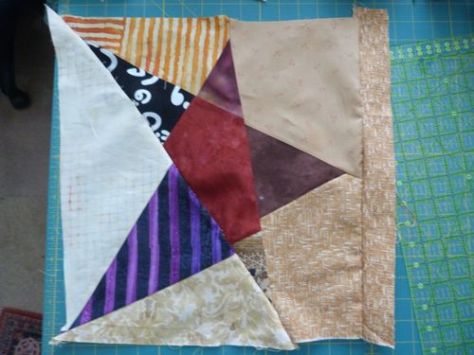
Although the instructions tell you which pieces to put together, I have my own way of doing it (LOL, I no longer follow my own instructions!) and I tend to start with the bottom three pieces in the photo below – star point to the left piece, and then to the right. I then go to the two pieces in the upper right sector, sewing from the straight line to the outer edge.

00StarsAssembly


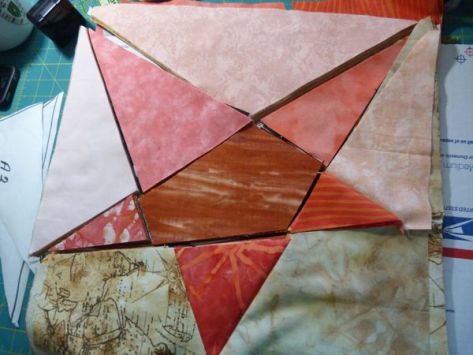
By taking your time and lining things up (it comes easier with practice) you get the interior lines to match up and end up with a fairly straight line. The fairly straight line makes joining the components easier when you sew the major three blocks together.00StarsFirstSection


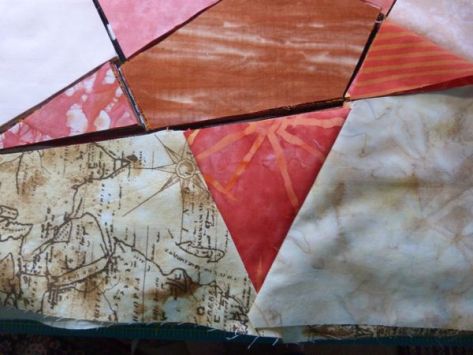
Next, I do the central three blocks, and when I finish them, I line up the star point seams and sew the small sector to the larger central sector. With any luck at all, you’ll have a nice join and the appearance of a straight line. Then you sew the last three pieces (upper left sector) together, focusing on making the interior seam the straight seam.


Because of the way these stars are cut, you are only very rarely ever going to get the last piece to line up at both parts of the center star, so focus on lining up the seam so that you get one straight seam with the join giving you a straight line at the upper right.

00StarsAddLastSection


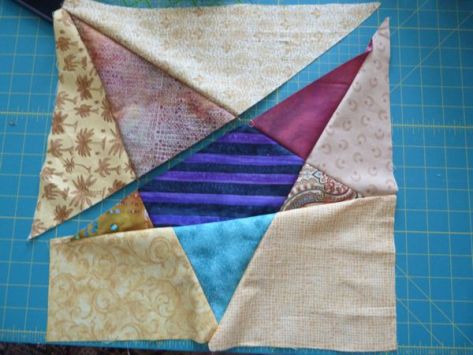
Things don’t always work out. Don’t worry. Wonky blocks are part of the charm of this technique. Two straight lines is great; three straight lines are awesome but all in all – are you having fun? No one is going to nit-pick this quilt, there are too many distractions! (Below is a wonky block I will truly use, but I wanted to show you that no matter how hard I try to be perfect, I am a miserable failure who sometimes doesn’t even manage two straight lines. I am a miserable failure who is having a lot of fun putting these stars together, though 🙂

00Stars2Straight2WonkyLines


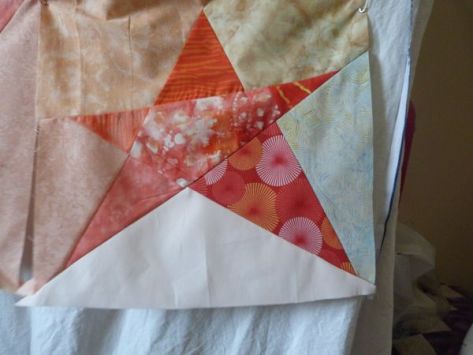
This star comes pretty close to the goal – Four pretty good straight lines, almost five. That fifth just isn’t ever going to happen.

00Star3StraightLines


But, even though they are all cut the same way, and I do my best to stitch them the same way, for no apparent reason, now and then one star goes wild. The truth is, no one but you will ever know, but this is why I save my leftover strips after I have trimmed the stars down before slicing.

00WonkyStarRepair


I even took this one apart and restitched it, but no matter what I did, it was dangerously out of whack. I added a one inch strip to the wackiest side, and was able to even everything up within reason, but this will never be a star that gives me satisfaction. It may, however, be one of those blocks that gives a quilt “character.” (When the blocks are sewn together, that addition will disappear . . . you just don’t see it in the wildness of all the diferent patterns and shapes.)


There are a lot of different ways to quilt these stars. In the African series, I used more angular quilting, and I liked it, it looked good with the African fabrics. In some of these quilts, I use a spiral out of the center block, and then elongated squiggles from the central star piece radiating out to the star tips. The background I stipple.