Kuwait Map Quilt

00KuwaitQuilt

There is a new Kuwait baby quickly approaching his birth date, and a baby for which a very special quilt needed to be made. His parents were instrumental in our having had such a good time in Kuwait. We were introduced by one of my Qatari friends who had spent time in Kuwait, and she was right – we were meant to be friends.

The first night we met, we started talking and never stopped. We explored restaurants together, strolled through the souks, and heard all kinds of stories of old Kuwait. Our time with them was – and is – priceless.

I like for a baby quilt to have legs – useful as a crawl pad, useful as a cover to sleep under, washable, washable, washable and in the end, able to be hung on the wall of an otherwish anonymous college dorm room. This one will do the trick, plus having lots and lots of patterns to keep a baby fascinated as he learns how to focus his eyes 🙂

I’d forgotten how much work a map quilt can be in the preparation stages. This relatively small quilt (60in x 60 inches until I washed it and it shrank about 2 inches in both directions; I’ve never had that happen before! It was noticeable!) has 900 pieces, and those 900 pieces had to include sea pieces, Kuwait pieces and Saudi and Iraq desert pieces (pale, pale, pale) Of course, there had to be a lot of variety.

00TrayKuwaitColors

00TrayOfSeaColors

Seeking, planning and cutting took longer than assembly. The land portions are quilted in the ditch, a grid, and the Arabian Gulf segments have waves quilted in thin silver strands, so they glint like the sunlight on the Arabian Sea.

There are many many blocks made from fabric finds from the Kuwait souks, also a few with Kuwait memories. In Arabic, there are “sun” words and “moon words” so I found a sun and a moon. A family nearby us had a private zoo where, from time to time, a large cat would escape and put my village in a panic until it was recovered . . . so there is a large cat. In the end, this was one of the most fun and rewarding quilts I have made.

00SpecialBlocks

Map Quilt Class

Map Quilts

28 January 2008


These are all the map quilts in one place, with class instructions on how to make them: 


00africaquilt.jpg 

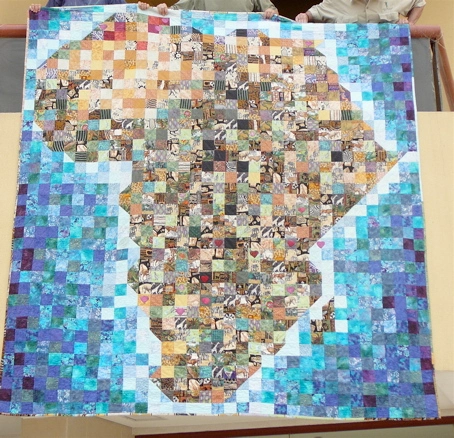
I left my Heart in Africa 

 00md.jpg

 Moroccan Dreams


00turkishdelight.jpg 

Turkish Delight 


00kafricatop.jpg 

African Kaleidescops 


Lawrence of Kuwait

Lawrence of Kuwait

1.  Start with a graph

Find the country you want to map, or state, or entire continent, and draw it onto your graph paper. It may change several times – that’s OK. You have time. Figure out what colors you want to use, and why. Identify any motifs you may want to use, appliqué, pieced or quilted.  Figure out what you are going to do with the area that is NOT part of your focus country!


2.  Gathering the Fabric

This actually takes the most time. You need many many different blues, for example, if you will have sea, shading from the very lightest to deeper purple, if it goes deep. You may want desert tones, or greens. You may want fabric from the country you are making, or you may want to appliqué something onto a square, and to identify where you will want it to go.


One really fun part is to ask your friends. You don’t need even a fat quarter, just scraps big enough for a couple squares. The greater the variety you acquire, the greater your flexibility in placement. As an example, I probably use 50 different “sea colors” ranging from the lightest blues to the deepest purples. My friends gave me Egypt fabrics, and Sudanese fabrics. 


These first two steps can take months, or even years. You will come up with all kinds of amazing ideas. Keep your plans for your map quilt in one place, and write down your ideas when you think of them, so you don’t forget them.


3.  Distributing the colors

I usually figure out where I want different colors – all the golds to almost white in the desert, for example, maybe this quadrant will be red. In the Africa quilt, I used pure black for some places where terrible things were happening. It helps the balance of the quilt to have colors grouped together, and that takes some planning. Also, now is the time to make any specialty blocks you may want to include.


Take a look at your fabrics, and at your graph. Figure out how big you want the quilt to be. In the first Africa quilt, for example, the smallest I could cut the giraffe fabric and still have it be effective was 3.5”. That one fabric, and my desire to use it, drove the entire quilt to its current huge size.


Even if you have been cutting fabrics all along, when you finally get to the point where you are ready to start – you will have to start with cutting. To have enough of every color, you just cut a lot. Even so, there are times when you will have to get up from sewing to cut some more.


I don’t go to a lot of effort to be accurate about terrain, but if you want to include a lake, or mountains, or something particular to that region, you can either use fabrics which show what you wish to emphasize, or you can create your own lake, or desert, or fields of flowers – it’s your quilt, you get to be the boss! 


Mountains: You can make a large mountain by making it four squares big, white mountain with blue sky , for example, or black mountain with blue or white sky. As long as you have planned ahead, anything is doable. Smaller mountains can be exactly the same size as the other blocks. It’s just nice to have a little variety. 


4.  Execution:

Break your quilt into doable sections. You might use quadrants, and each quadrant usually has a dominant color. Cookie trays can keep the squares in some kind of graduated order. Always have the graph on the wall, so you can check it frequently, and use a project wall, where you can hang the completed sections and check them as you go along. 


You might do two rows, sew them together, and then sew them directly to the section where they belong. It might seem fiddly, but it helps you keep track of where you are on the graph, and it helps you see where you might want to add more deep / light colors, etc. It is also just a lot of fun to watch it grow.


As you go along, check off each row as you complete it. Again, it may seem fiddly, but it is easy to get lost and confused, especially when you are working on a section of coastline, and you need to get the half-square triangles going the right ways! 


5.  Quilting and Embellishing

It has been so much fun, just watching all those colors come together and blend into a fabric collage of a country. Now is time when you can make it even more special.


Make the sandwich. 


Do a quarter inch outline of the continent/country you are working on, very first thing. It helps keep everything stable, and it gives your focus some definition.


If there are particular quilting motifs you want to use – a mariner’s compass in the sea, for example, or camels crossing the desert, or a hand of Fatima, or a teapot – you’ve been gathering them all together, and now you get to have the fun of putting them in.


You might want to do waves, and spirals, and fish in the sea. You might have your own ideas to make this quilt uniquely your own creation, and now is the time to explore them. These map quilts are not serious quilts, they are supposed to be fun. 🙂


6.  Surprise.

In every map quilt I do (and in many of the others) I put a surprise. In the Morocco Dreams quilt, I put a camel in the desert, so big you couldn’t see him unless you stood about ten feet away. He was in slightly lighter colors than the rest of the desert. I also outlined him in hand quilting. 


You might want to machine quilt in the name of the person for whom you are making the quilt, the date and the place. You  might want to machine embroider your own name in the quilt, in an inconspicuous spot, where some quilt-heritage researcher may someday find it and rejoice! Most of all, this is where you can have fun with embellishing the map so that it tells something about why you chose this country, something about how you feel about this subject. Here is where you can use charms and beads and crystals to highlight special and unique qualities.


Photos and more instructions at :  worldquilter.wordpress.com.  Click on map quilts under categories, over on the right hand side.

Cutting Up In January

One of the keys to quilt production is organization. Once you’ve got Christmas all put away, it’s time to look at the quilting room.   
I have a secret vice. I LOVE rotary cutting. I love it so much that sometimes my quilting friends will ask me to cut things out for them and they will stitch things up for me, or do some other craft related favor. It all works out in the long run ;-).   
So you can imagine – I love January. January is when I grab those boxes and baskets of scraps I have tossed. I put an iron and ironing board in my sewing room and starch (good old Sta-Flo) up all those scraps and iron them, then cut them up. I cut 2 1/2 inch strips first. I cut blocks in 7″, 6.5″, 6″, 5.5″ (etc) . . . . and store them in piles with a lable on top. Just as I love those 2.5″ strips, I love the 2.5″ squares, and have shoeboxes of them, all sorted by color.     
(Remember those map quilts we looked at earlier? When you need a zillion different desert colors, or greens, or blues for the sea, you already have a goodly stash cut up if you do your January homework.)    
You can also do that   Sweetheart Quilt, either in reds or in a variety of scrappy colors. I think I remember that it takes about 49 squares per block – that uses up a LOT of scraps, and it is a fun quilt and a quick quilt to make, again, a great group activity.  
It also makes sense to cut up all those squares with a bunch of friends because you can exchange and have lots and lots of different scrap colors in your quilt. Some years, I have gotten together with friends and we’ve all cut-up together, and that is really a lot of fun. It has to be the right friends, though, who can balance FUN with a sense of mission – I am a little obsessive (a LITTLE???) about getting my January cutting done. The best year was when we brought food, and just kept cutting and cutting until we were all ready to drop.    
And here is the really cool thing. As you cut, you come across fabrics you had totally forgotten, and those old creative juices start flowing. As you cut, two or three or four quilts will start forming in your mind, so keep you little gridded notebook handy, and write down those ideas before they slip away!   
Once you have all those scraps cut, labeled, sorted and put away, take a couple hours to get your workroom back in order. If you are anything like me, the creation process is messy. I pull out all kinds of fabrics, looking for just the right combination, and you know, while you are on a roll is NOT the time to be obsessive about putting things away. . . you just cut and sew and audition and back to the drawing board – it’s a burning-the-midnight-oil kind of energy, and you don’t want to dilute it with dutiful energy, just go go GO!   
So from time to time, you have to pay the piper. This is a good time – now that you’ve so virtuously cut up all your scraps – a great time to sort all those fabrics and put them back neatly on the shelves. Again – you will see old friends you have totally forgotten, and they will call out to you, and new ideas will pop into your head. But this isn’t the time to dilute that virtuous, dutiful energy with creative energy; quickly jot down the ideas but KEEP GOING, straighten, organize, file by color and pattern, get it all put away.   
Once you have your work room all neat again you don’t need me to tell you what to do next. You will be on fire to get started. Don’t ya just love that January energy? New year, new quilts?


Kaleidescopes

Kaleidescope Play
24 September 2007

Careful cutting and piecing are key to the success of every Kaleidescope. If you will take your time in the cutting and piecing stages, your blocks will be perfect, every time.

Cutting for a level one Kaleidescope, two fabrics:
Cut 5 strips 4 1/2 inch wide, width of fabric, from light fabric and 5 from dark fabric.
Cut 3 strips light and 3 strips dark 3” by the width of the fabric, cross cut into 3” squares,
slice diagonally.
Using template or ruler, cut dark and light wedges for Kaleidescope. You should get 20 per strip, minimum. It takes four light and four dark wedges to make each Kaleidescope block. So one strip makes about enough for that color in 5 blocks.

00k-2-colors.JPG

If you are only doing two colors, make two piles of wedges, one dark and one light. If you are doing a more complicated Kaleidescope, you may want to choose wedges for each block individually, either before you start or as you go.

Piecing:

I usually put the light piece on top of the dark piece; it helps me remember, every time, so I don’t have three sets going one way and a fourth set going another! I also prefer to sew from the larger end toward to bottom end, as it seems to get stuck in the feed dogs less often.

Then you put two sets of twos together. Dovetail the center seams; push them up tightly together, and stitch. This time, from the wide end, it will be dark on top of light for both sets.

00ktwo-quarters-together.JPG

You probably think it will be tricky sewing eight pieces together at the center of the circle, but there is a trick. lay them together, right sides together, and where the centers will meet, push the seams together, top seam going one way, bottom seam the other. If you make the junction nice and tight, your kaleidescopes will be perfect, or nearly perfect, every time.

You can pin if it makes you feel more secure, but remember to pull the pin out – don’t sew over a pin!

00k-two-halves-together.JPG

Some very respectable authors (Marty Mitchell for one) will tell you to sew corner squares on before you sew the wedges together. Others – equally respectable – say to sew the corner pieces on after. For me, if I were making a simple two color kaleidescope, I might sew the corners on as I go along. But because I play a lot with color gradations, and with larger patterns, I wait until the blocks are all finished, and then I put the corners on. It goes very quickly, and it gives me more opportunity to play with the lines.

(A quilting friend who is very precise says that the 3″ square does not work for her, that she needs a 3 1/4″ square to get the corner pieces big enough for a generous block. She wants all her blocks to equal 8″. It is not so important to me that the blocks be 8″ as that they all be the same. If you want to cut your squares 3 1/4″ too, be my guest. I am guessing that the reason the 3″ squares work for me is that I put the corners on AFTER the wheels are put together, every time, because most of the time I am working with color placements, and the corner colors can become critical in the advanced level kaleidescopes.)

Marti Mitchell says to match up the corners, not to just make the corner point to the center. I find that making the corners point to the center works just fine, but you should probably do it the way Marti Mitchell says to do it, unless you like the other way better.

When all your blocks are complete, trim them to a uniform size. It may not be exactly 8 inches, it may be 7 1/2 or 7 3/4 or 7 7/8. It doesn’t matter, as long as they are the same size.

00k-afr-placement.JPG

Lay the blocks out, so you will be sure you have the rows in the right order, then sew each row together, and sew it to the rows you have finished. Carefully match all seams. Check after each row to make sure all seams match before going to the next row. Put on borders if you wish, or bind and quilt.

Hint: Because I like a Kaleidescope quilt to be symmetrical, I always do Kaleidescopes in odd numbers, so that the corners will all be the same and the sides will be the same. It isn’t a hard and fast rule, it’s only my preference. But that’s why I chose a practice size of 25 blocks, so that you would have enough blocks to practice, and then a quilt big enough for a baby quilt to give away. And it would be symmetrical!

Level two kaleidescope – playing with analogous colors:

00k-graded-colors.JPG

Level three kaleidescope: playing with lines, using kaleidescope motion but taking some of the colors outside the kaleidescope rules – hoping that the alternation of light and dark MOST OF THE TIME will carry the movement while still breaking out of the rigid light/dark rules. 😉 This is where even color in the corners becomes critical, and you really really need a project board:

00kafricatop.JPG

This is going to be my husband’s Christmas present. I have to trust that he finds my quilt blog so boring he never checks it! And Woooo Hooooo, this was a real challenge for me, and a lot of fun. African animals, African people, African colors, several fabrics from the Sudan, Senegal, Tunisia and South Africa – oh, I had so much fun with this one.

There is another level, level four. A friend is going there – warping the kaleidescope block. I’m not there yet.

Moroccan Dreams

Slowly, slowly a ghostly record of my body of quiltworks builds. For those of you who have tuned in recently, this blog is my online record of quilts I have made. It will always be incomplete, there are so many I made and gave away without ever even labeling. Oh well!

When I made my most recent move, an entire box of quilt books disappeared. It makes me ill – some of the books were out of print, and I used many of them for teaching. I have been able to reconstruct a ghost of the library, and this blog is a ghostly reconstruction of the Quilt Diary I lost with the quilt books – samples of fabrics used, etc.

This was the second map quilt I made.I have a very citified, sophisticated niece, and I never dreamed she would want something so homemade as a quilt, but once, when she was staying with me, I asked her if she ever wanted a quilt, to let me know what she would want.

Without hesitation, she said “I already know what I want. I want a Morocco quilt like the Africa quilt you made for (your husband).

“Wooooowie! Oh what fun! I sent her into the quilt room to rummage through fabrics, and I hand her some sheets of paper, some scissors, a pen and some glue. She came back to me with three pages of fabric samples and why she wanted them in the quilt, what they reminded her of.

Oh, what fun – a collaboration.

This is the only time I have ever done mountains. I did some single mountains, and some smaller foothill mountains.

Because Morocco is shaped so oddly, I ended up with a lot of sea (which I love) and a lot of desert (which is kind of a drag). So in the desert, I put a surprise. I told my niece when I gave her the quilt that there was a camel.

She looked and looked, and only one day when she was standing far enough away from the quilt did she see it – and laughed!Can you see it, shimmering in the rising heat of the desert?

00md3.jpg

On the map I was using to do the graph, I found the warning below. My niece and I both speak French, and are undeterred by warnings, so I included it on the front of the quilt, bottom right corner.

00morocco2.jpg 

UPDATE:  TOO COOL! In my January cleaning up, I found the original graph for the Morocco Map Quilt, AND I found my niece’s fabric sheets – she chose the fabrics she wanted used and made notes as to where and why to use them. 

00moroccoquiltfraph.jpg 

00andreasmoroccocolors.jpg 

I Left My Heart in Africa: The Original Map Quilt

This is the quilt I told you about earlier, the Africa Quilt. It took me so long to get a photo up because the quilt is humoungus. When I was busy cutting out all the fabrics for the quilt, carefully collected over the years, one of my friends said “It shouldn’t be called ‘I left my heart in Africa’, it should be called ‘I left my BRAINS in Africa.'”

It was a labor of love. I was still fairly new to quilting, and so unsure of my machine quilting skills that I actually did a lot of hand quilting – I hand quilted 1/4 inch all the way around the continent, I hand quilted a hand of Fatima in the upper NW quadrant, along with a Tunisian tea pot and a caravan of camels going in and out of Ouagadougou.

(When we were at the Embassy in Amman, one of the state-department wives jokingly told me that if you were bad, you got sent to Ouagadougou, and it always gives me a big grin to think of it.)

While making this for my husband, I had to hide it every night before he came home. One night I was still working – he hadn’t called me – and I saw him drive up. I was still desperately trying to stuff it all in the closet when he got home, and he got a fairly cool and distracted welcome, something like “you didn’t call me to tell me you were coming!” which hurt his feelings.

At Christmas, when he opened the quilt, I told him that’s what had happened and we both got a good laugh. He loves this quilt, and he has told me he wants to be buried in it.

We often go to Africa. We love to go there, and every time we go, we sew another heart on. We have been to Morocco, Tunisia, Egypt, Kenya, Tanzania, South Africa, Zimbabwe, Zambia, Botswana and Namibia. Lots of hearts! So we say the quilt is still a work in progress.

I machine stitched in the ditch for the continent, and then did a wave stitch in the ocean, which is actually about half of the quilt. You can see how using a very light blue at the coastline, and then graduating into the darker blues makes the continent really pop out.

00africaquilt.jpg

Northwest quadrant:

00nwquadafrica.jpg

Hearts across South Africa:

00africahearts.jpg

This one is entirely 3 inch squares (there is a giraffe fabric that I couldn’t go any smaller, and that drove the size of the entire quilt) and half squares. What was really fun is after getting over being aghast at the scope of the quilt, many friends came up with fabrics for it, especially Egyptian themed fabrics, all of which adds to our joy in using the quilt. I have some fabric bought many years ago in Tunisia with Berber symbols on it which I used in North Africa, and Sudanese fabrics I used in the West African sections. There are a very few pure black squares, in places where truly awful things continue to happen in Africa.

Did I mention we love this quilt? 😉

Update: If you want to make a map quilt, just click here. If you want to see other map quilts I have made, click Map Quilts under the Categories on the right side of this blog.

Map Quilts Planning and Execution

I’ve made three map quilts – one seems to lead to another. The first is I Left My Heart in Africa, and I will put a photo up as soon as I can get one taken. The quilt is so huge that photographing it will require hanging it off a balcony – and it will take at least two people. It’s a big quilt.

When I asked my niece if she would ever like a quilt, she immediately said she knew just what she wanted, a Morocco quilt. She will photograph it next time she is home – it’s another photo that got lost in the last move, which is why I am putting all this online.

A local friend asked if I would do a map of Turkey for her, and I was happy to do it; she is a dear woman and . . . I like Turkey, too.

Thinking about a map quilt takes longer than actually doing it.

The very first thing is that you get an Atlas and some graph paper and do a basic outline of the country you are going to do – or continent, as in the case of Africa. Before you make the map, you need to know about how big you want the squares to be – for example, I needed 3 1/2 inch blocks for the Africa quilt to use some of the giraffe fabric I wanted to use, and that was the minimum I could make work.

Once you have drawn the country, you know how many squares you are going to need. I use only squares and half squares for the outline, and on Morocco, I made mountains using a stitch and flip technique.

00planninggraph.jpg

You will need a project wall to put the rows up on as you sew them. Every two rows sew together, and sew every two the the group above.

You need a lot of fabrics. Where there is sea, you need to have a variety of very lights, to go around the coastline, and a lot more mediums, and a good variety of darks. Tell your friends you will accept any and all scraps that can be used as water, from the very lightest colors to the very darkest.

(With the Africa quilt, friends came up with all kinds of great scraps, including some Egyptian scraps and African symbol scraps. Very cool.)

Where there is land, I use yellow/sand/beige, and, like the water, I have the lightest colors closest to the land mass. Countries surrounding the country you are highlighting get nothing but blah colors, so that the featured color stands out.

Around the edges of the country or continent, I use the darkest colors; the contrast between the dark and light makes the country pop out.

You’ll need to count the number of half square triangles that are land and sea, and the number of half square triangles that are land/land and prepare the half square triangles before you actually start assembling the quilt top.

I also count the land, half triangles and sea/other land squares and put the number in each row. Saves time.

If there are particular motifs you want to include, you have to make them first, unless you intend to applique them later. For the Turkey quilt, my friend wanted a single engine plane and a sailboat, which I made into a dhow. I added the protection against the evil eye and the hand of Fatima. Block them in on the graph.

I usually divide the graph into quarters, and I plan a dominant color for each sector. You will also want transition fabrics to get you from one color to the next.

If you have a large block of land or sea and you want to put something in it, you need to plan that ahead of time, too. In my neices Morocco quilt, there was a large desert area that I couldn’t do anything about (in a rectangular quilt) so I used slightly lighter squares and made a great big camel. I also quilted around it. I told her there was a camel in the quilt, but it was months before she found it – you had to be standing far enough away, and it would pop into view! So – have some fun with this.

Start cutting your squares. You aren’t going to cut the exact number you need, because you need to have lots and lots to choose from, so you cut and cut and cut so that you have masses of squares.

When you sit down to put together the quilt, figure out what dominant color group you will be starting with, and have those closest to you.

00tdcreationprocess.jpg

00td-creationprocess2.jpg

As you finish each row, cross it off. As you start the next row, make sure there are no two identical squares next to each other, or above or below.

NE Corner
00necornertd.jpg

NW Corner
00nwcornertd.jpg

SW Corner
00swcornertd.jpg

SW Corner
00secornertd.jpg

Sea shading from light to dark
00shadingintosea.jpg

Land shading into Syria
00shadingintosyria.jpg

The quilting is easy – you stitch in the ditch on the landmass, and you can stitch waves or stipple or free motion in the sea and land.

00quiltingtd.jpg

Finished project:
00turkishdelight.jpg